Showing posts with label apartment. Show all posts

Thursday, December 4, 2014

Christmas DIY: Twine wrapped bottle

I like wine. As a result I have some pretty interesting bottles around the apartment. I usually accumulate a few with plans to "do something" with them. I go on Pinterest for ideas, don't find any I like and eventually I get tired of looking at them (and feeling like a hoarder) and they make their way to the recycling bin. Well, I'm happy to say I have finally found a project that I love! This is very easy to do and I may do a few more! I would count this project as a "win" but I also want to share some tips with you to make it an even better success for you.

For this project you will need:
Twine
Glue gun
Glue sticks (lots-if you think you have enough get more)
Glass bottle
Berries from floral department
Time


TIP: The first tip I have is on the Twine. Aside from the bottle (and time) I was able to get all my supplies from the dollar store. I purchased a 3 pack of twine from the hardware section and while it served the purpose- I paid for my frugalness in time. The Twine I picked up was very thin and sometimes had rough sections in it. I would suggest finding a thicker twine which I think would save time on this project. Because of my twine, my project took about 4 hours. I would imagine buying a better quality twine (and not getting distracted) could cut this down to 1 hour.

To begin you will need to squeeze a dab of hot glue on the mouth of the glass bottle and attach your twine end. Be careful not to burn yourself.


TIP: I have seen people use other types of glue. I prefer the hot glue because it dries quickly and spillage can be reused. If you have any glue that has squeezed through the rows of twine simply touch with the tip of your gun to smooth out or reposition your string.


Work your way down the bottle, keeping your twine tight. You do not want any gaps between each row. I chose to squeeze glue along the entire line rather than adding glue in dots. I haven't tried it the other way but I think it give you a smoother look and secures the line very well. When you are finished you can add any decoration to the front. I made my bottles to add to my Christmas display but I may want to use it after so I used a flat ornament and draped it around the neck of the bottle like a necklace. After Christmas I can easily remove the ornament and it will work year round.


Monday, July 16, 2012

Turning Pages

Don't judge the book by it's cover. Judge the owner by it's condition.
-me..like just now...lol.

If one were to walk into my home last week you would be greeted by this atrocity...

easy color coordinated bookcase by raeosunxine


which would garner this response from you...


...tragic. lol


To stop this reaction from friends and family- as well as make a better home for my family and myself- I have set out to redecorate my living room with a focus on the book case.

I have never been one to like the living room's focus to be the television. I feel it is wormhole of time. You sit on a Saturday to watch one measly HGTV show, next thing you know your entire day is gone. What  I do like is bookcases as the focus of the room. I have seen a few places online that have color coordinated their bookcases and I think it looks fantastic.


These styles look great, but when I was doing research into how this was accomplished I only found two answers. Actually organize the books by spine color or cover them. I don't know about you, but I haven't covered a book since Jr. High and even then it was an ordeal! That got me thinking. If only the spine is showing, why cover the entire book?

Well...I had a stroke of DIY genius this weekend. To coordinate my bookcase I decided to cover the spines of each book. How?

Duct Tape.

No, Seriously! This isn't your grandfather's old roll that he used (sometimes unnecessarily) to do quick (and cheap) repairs around the house!

None of this! Funny ones here


I found a wide range of colors and patters by Duck Brand and Scotch.

I settled on 3 rolls and 3 pens: 
Solid Black (Ace Hardware)
Solid Gold (Duck Brand Duck Tape)
Lace Pattern (Scotch Duct Tape)

1 Black Sharpie
1 Silver Sharpie
1 Krylon Shortcuts Gold Paint Pen

You will also need scissors.


I love the lace pattern.

I also started with 2 new bookcases. I choose to double up because I feel it gives the project a better look.


I simply held the book, spine up, between my knees. I was sure to cover all of the spine to keep this project from looking sloppy and used my scissors to cut the end. DO NOT try to tear this tape. It was created to be flexible but secure. It WILL look bad. When I finished my first book, this is what I got...


After a while it came to this...


Then eventually this...

Who knew a little duct tape could go so far! I am very happy with the result and  love the fact that it only took an hour and  half to complete. None of my books are damaged an everything flows! I accessorised my book case with an old rotary phone from my grandmother, 2 large chess piece candle holders from Target ($2.50 each), an anniversary clock I had lying around and a recently repainted giraffe sculpture.


I am very excited to see what my new space will look like when my gold accessories are hung and the new furniture arrives (read about that here).


Stay tuned for updates!
À bientôt!

Redecorating-DIY style

For a long time I have been living a lie. I love decor. I receive Better Homes and Gardens, Southern Living, House Beautiful and other publications just because I love having a comfortable home. My home, however, is what I would call "stupid ugly". You asked what stupid ugly is? Glad you asked.

Stupid Ugly: [stoo-pid, styoo‐]+ [uhg-lee] adj.
1. very unattractive or unpleasant to look at; offensive to the sense of beauty; displeasing in appearance and dully tediously dull, especially due to lack of sense; inane; pointless.
2. Useless and horrid at the same time.

-used uncommonly to describe rooms that have useless knickknacks and offend the visual senses. Rooms that make you feel like you have become dumber by walking into them. Room that make you question if "sight" is a blessing curse.

Orgin: [C16: from French stupide, from Latin stupidus silly, from stupēre to be amazed]  combined with 1200–50; Middle English ugly, uglike < Old Norse uggligr fearful, dreadful, equivalent to ugg ( r ) fear + -ligr -ly.


Yes...it is THAT bad...Don't believe me, huh? Okay, but remember that you have brought this on yourself....Here are pictures.

Extremely unorganized bookcase

The last tube TV alive

Hubby on the sofa playing games

The hub's granny's table- which he protects more than myself and the child.

Uggg. I can't take any more..I may get sick!


Okay maybe it's not that bad but as an adult woman who works VERY  hard and has not made ANY large purchases (other than the cars we need to get to work) I think I deserve a remodel.

Now, the next thing you need to know about me is that I am frugal. My mom knows it, as does my husband, sister, daughter, boss...you get my drift.Its so bad that when I brought up the idea of new furniture my mom and sister talked me the whole way to the store, my boss called my cell to make sure I wouldn't get sticker shock and chicken out and my 5 year old sat in the back saying "cheeeeep, cheep, cheep cheep!..I got the hint guys!

Before diving into my project, to make myself feel better I had to justify the spend. So I found places in my annual budget that I could cut back like the $84/month I pay into a storage unit that I only visit once a year and I also found ways to offset my costs by selling things I was getting rid of (still working on).

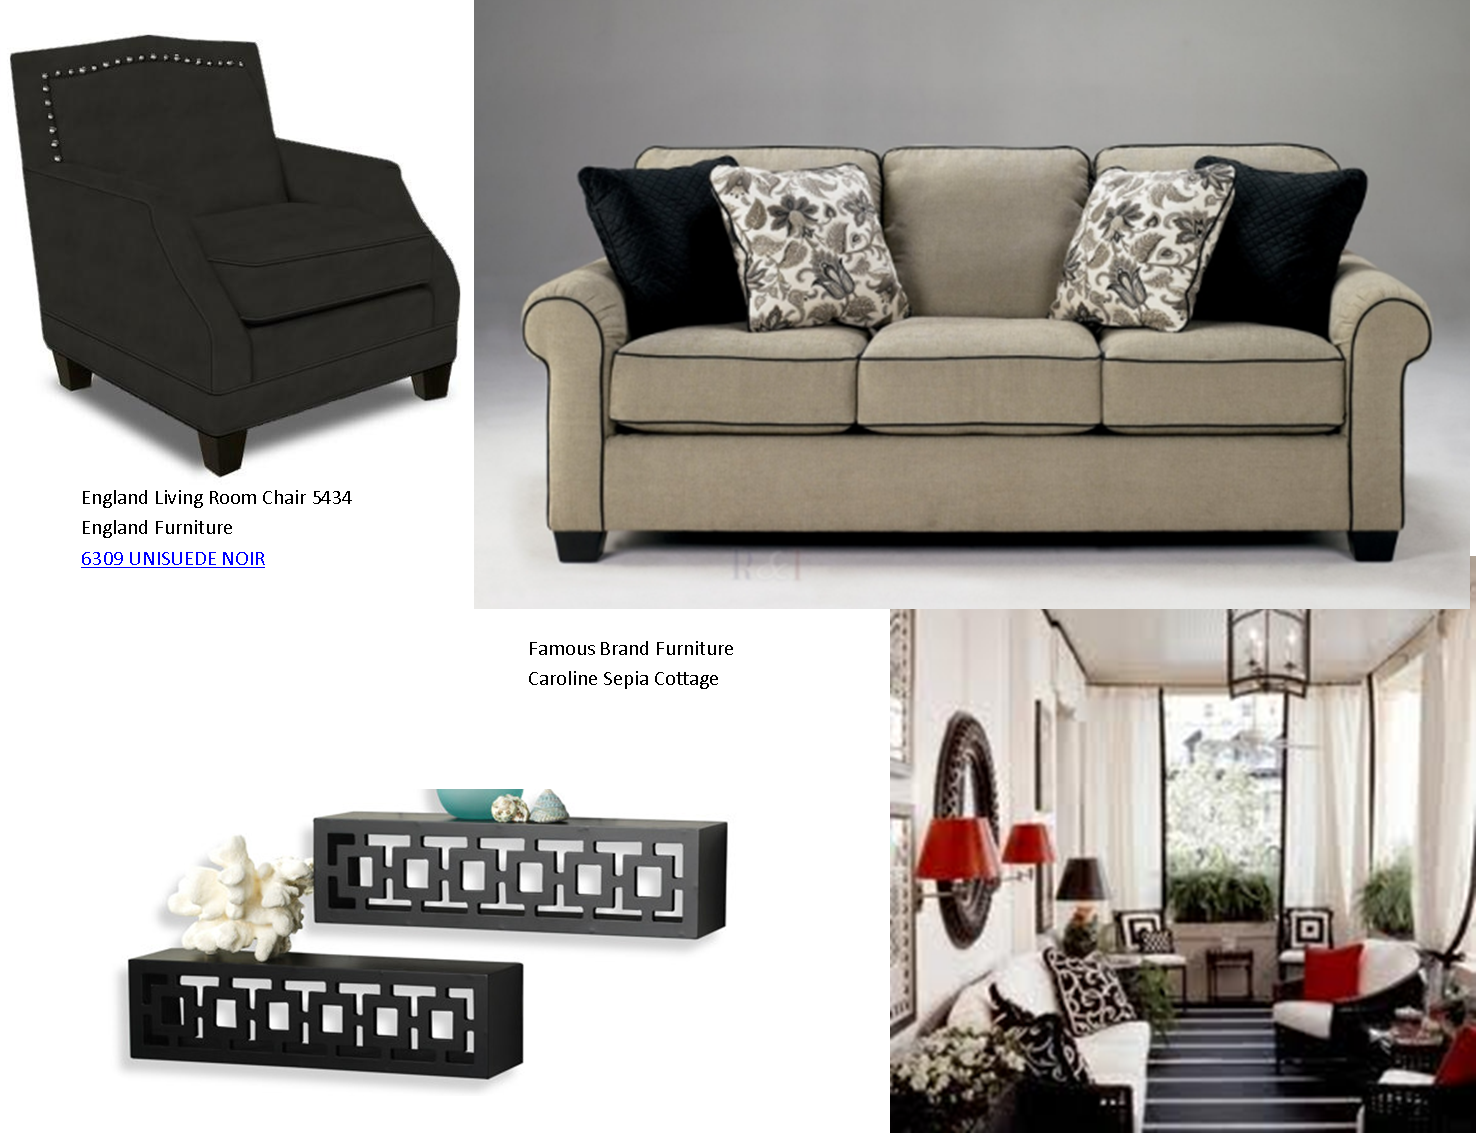
Next, I researched my preferred style. It changed probably 5 times before I settled on this look for my inspiration....


 aaaaaaaahhhhhhhh! So posh, so elegant...so clean....(note to self).
I started by de-cluttering my home (still working on...too...much...junk...)
Next I went shopping for my new furniture. I found lots of styles that I loved and also discovered that I have Champagne taste and beer pockets! Dang it!

I loved this but it was more than I wanted to pay for an APARTMENT with a small child...one day my love, we will be together. 


I settled on this look instead.


(minus the red accents)

the new look will include on sofa and two arm chairs...similar to that sofa I wanted in black micro suede. Livable and classic.

Okay so get to DIY...I hear ya!
So once I get the furniture in (10 days or so) I need to have everything else ready to match the inspiration. The two things that stand out the most to me are the gold accessories and the color coordinated book case. I started with the accessories. I could have gone out and bought some gold items, I realize that. But, I am more of a project woman so I went to Michael's Arts and Craft store to pick up some gold metallic acrylic paint and a sponge brush. Then I dug through my closets. There were SO many things I found that I could just paint to make it work. I also went to Bed Bath and Beyond for shelves as well as a local junk antique shop for items.

Metallic paint and sponge brush came to a bit under $4.00


Shelf from Bed Bath and Beyond on sale for $19.99  $9.99! Score!
Also found cast iron hooks hooks for the wall at $4.00 each and various frames in the closet for free.

So here is what my collection looked like after painting!

I am really looking forward to seeing the geometric shelves hung on the wall!


I also noticed the gold lamp shades in the inspiration photo. I have two tall floor lamps with white shades...lets paint those too. The one thing that I did and suggest is remembering that since these
  are lamp shades they will look transparent when on- meaning an uneven painting job or product will leave it looking streaky.

To fix this I used Krylon's Black and Silver for plastic spray paint on the inside.

The black stops the light from showing so much on the outside and after it dried I sprayed a layer of silver to help heighten that light source that we are cutting a bit. This is what the INSIDE of the lampshade looks like. BE SURE THAT YOU HAVE A LAMP THAT HAS ENOUGH SPACE TO NOT CAUSE A FIRE FROM HOT BULBS! I was confident in this process for me because on the lamp I use the shade and bulb never come in contact. the shade attaches to the base of the lamp head, followed by a large plastic washer to keep it down and I use Energy efficient bulbs that do not get as hot as traditional bulbs. Team that with the fact that we rarely used the lamps in the first place and it made sense. BE CAREFUL!


This is the outside painted


And powered on.


Tada! see what I mean about the silver inside?
Lastly I tackled the bookcase but that will be in another post. I had a moment of DIY genius! Click the post "Turning Pages" to see how I took this...

And created this!


Things are shaping up!

Monday, July 2, 2012

Mourning Domino- Celebrating House Beautiful

When Domino Magazine went out of production I was devistated...no really. I did in fact shead a tear...or two. I'm so emotional.


sniff-sniff...

Well, find solice in newly found

HOUSE BEAUTIFUL

Hear the Angelic Chorus?
(aaaahhhhhhhh!)

Now, this magazine was founded in 1896 by Eugene Klapp, a Chicago-based civil engineer.
Back then, it looked like this

The magazine's Facebook.com page is VERY well done (makes me want to go back and do my company's page better!) in 1907 the site:
"By its third issue in 1904, the magazine had been turned over to Herbert S. Stone who ran it for the next 10 years. From the time he acquired the magazine, Stone wanted readers to know that beautiful homes need not be the private preserves of the wealthy. To illustrate his point, Stone created a popular series in the magazine, "The Poor Taste of the Rich," accompanying it with photographic evidence of their design transgressions."


Please see the Facebook page. If you are anything like me and love decor and history you will definately enjoy this page!  Today if nothing else they have earned a new subscriber. I can't wait to see all that House Beautiful has to offer. I feel so inspired to do new things and so happy to find a fix for my lack of Domino!
You can find them @:
follow @housebeautiful on Twitter
Can you tell I love it?
Here are a few of my favorite shots from thier site!
This is from local designer Naomi Stein


Use of mirrors to make a small kitchen look larger! Brilliant


Color blocked bookcase


Sunny Sun room


The ULTIMATE girly kitchen


color in the pocket


I love this bathroom!


I love the walls...reminds me of Jolly Ranchers